Documentation
Follow below steps for hassle free setup
Installing Plugin
# Remove Free version of Plugin.
– Under Plugins, go to ‘Installed Plugins’, find Free plugin ‘Listings for Appfolio’.
– deactivate and delete.
# Install and activate “Listings for Appfolio Pro”.
– under Plugins, go to ‘add new’
– click button ‘Upload Plugin’
– browse for plugin file you have purchased and click ‘Install Now’
– activate plugin.
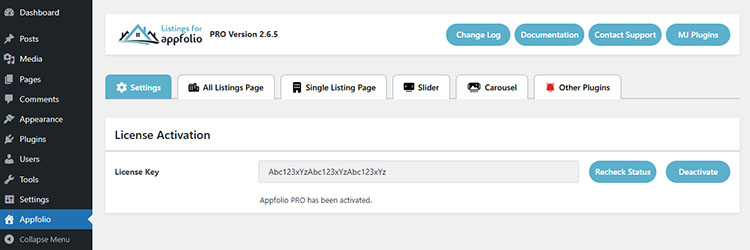
# Activate your License Key
– under ‘Appfolio’, select ‘settings’
– insert your License key and click ‘Activate’ & then ‘Confirm’

Appfolio Settings
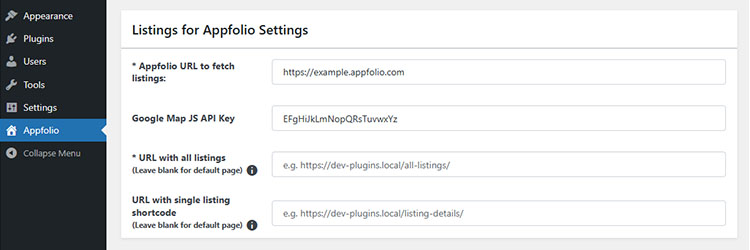
# Enter your Appfolio Listings URL
– Under ‘Appfolio’ go to Settings and Insert your link
Note: do not add “/” in end of your link
Correct – https://example.appfolio.com
Wrong – https://example.appfolio.com/

Google Map Settings
# Enable or Disable Google Map
– Under ‘Appfolio’ go to Settings
– Insert Google Map JS API Key to Enable google map
– Leave this field blank to Disable google map

Display Your Listings
# Add Short-code to Page
– Create a New Page
– Paste short-code [ apfl_listings] and Save the page

All Shortcodes
# Display all listings with default settings
# Display Listings from different URLs
# Display Listings from different Groups
# Display Types/Groups as a Filter (separated by commas)
# Hide Map on specific pages
# Display Single Listing Anywhere
# Display Search Form anywhere
# Separate Listing Details Page (enter this page URL under plugin’s settings)
# Listings Slider
# Listings Carousel
# Display Listings from Multiple Accounts
# Display Limited number of listings, hide Map and Filters
– Go to the Google Cloud Console: Navigate to the Google Cloud Console.
– Select Your Project: Make sure you have the correct project selected from the project dropdown menu at the top of the page.
– Access API & Services: Click on the “Navigation Menu” (three horizontal lines in the top-left corner), then select “APIs & Services” > “Credentials.”
– Identify Your API Key: In the “Credentials” page, you will see a list of API keys. Find the API key you are using for the Maps JavaScript API.
– Edit API Key: Click on the name of your API key to edit its settings.
– Application Restrictions: Scroll down to the “Application restrictions” section. Select “HTTP referrers (websites)” to restrict the usage of the API key to specific websites.
– Add Your Domain: Under “Website restrictions,” click “Add an item” and enter your domain in the format specified (e.g., example.com/* for a broad match or https://www.example.com/specificpage for a more specific path).
– Note: Ensure you include all variations of your domain that your application might use, including with or without www, different subdomains, or any specific paths, if applicable.
– Save Changes: After adding your domain(s), click the “Save” button at the bottom of the page to apply your changes.
Troubleshooting
Still need help? Contact us for help.
Please make sure to follow all steps for PRO plugin installation. Common known issues can be fixed by following tips:
– Delete FREE version of plugin.
– Use a Shortcode block instead of content block if using any page builders.
– Use full URL including https:// for your appfolio URL under plugin’s settings.
– Make sure to remove “/” at end of your appfolio URL.
# Listings not showing from a Group
Follow these steps to create a group and adding properties to that group:
– Login into your appfolio account as a account owner.
– In the top search bar, type group and then click “Property Groups” under the Pages.
– Now click “New Property Group” from the right sidebar to create a new group.
– Enter the group name as you want and then select the properties that you want to add to this group and click Save button.
– Now, from the left menu, click Vacancies under Leasing menu item. On this vacancies page, click “Post” button next to the Website for each listings under that group.
– Now the listings/vacancies from that group are ready to be shown on your website. Use the below shortcode in the page/post on your WordPress website:
[apfl_listings type=”888 State St”]
Replace “888 State St” with your group name and the listings from that property group should display on your website.
